![]()
Using WordPress can be easy once you have the basics. Having a website, blog or both; offers people with a minimal understanding of how to enter & edit text, upload images, and navigate an administrative panel…a way to showcase their company, sell their products, or have a platform to express their ideas and share information.
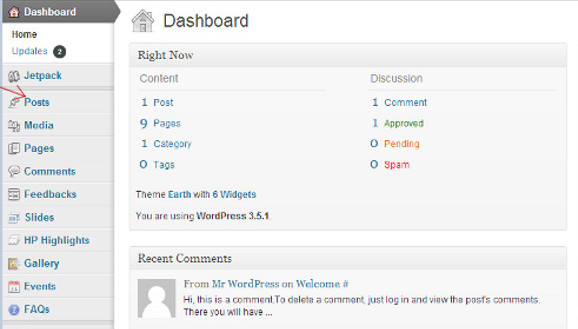
To Edit an Existing WordPress Post:
On the left-side of the” Dashboard” (Admin Panel), click on ‘Posts’, the existing posts will be displayed at the right.
Click on image to enlarge & view detail
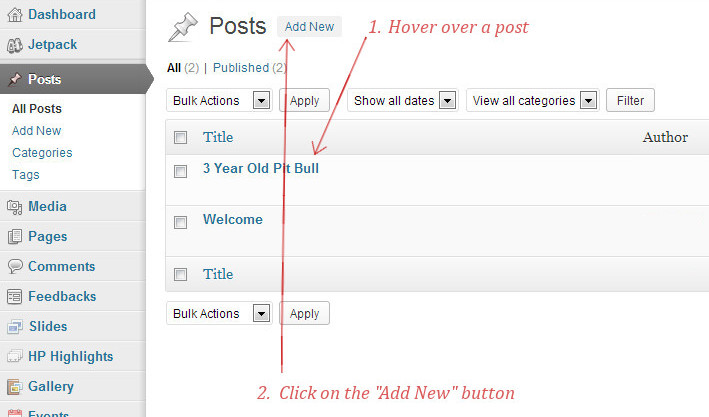
2. If it’s an existing post, hover over the one you want to edit; (See .1 on the screenshot below); and these links: Edit |Quick Edit | Trash | View | will appear. Choose: Edit |
3. If you want to add a new post, follow the steps in the paragraph after the screenshot below.
Click on image to enlarge & view detail
To Create a New WordPress Post:
1. Click on the ‘Add New’ button, and a post with no title will appear. Make sure to put a title in the box under where it says ‘Add New Post’ at the very top of the page. (See .1 on the screenshot above to locate the ‘Add New’ button.)
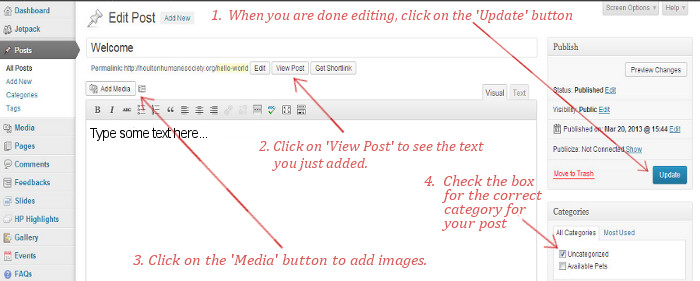
2. Your post will need to be put into a category, check the box next to the category you want it to appear in. (See .4 to locate ‘Categories’ found in the lower-right of the screenshot below)
Note: Don’t forget to click the ‘Update’ button EVERY time you make a change to your post!
(For new posts the ‘Update’ button will display ‘Publish’ the 1st time you work on it. After it is published it will say ‘Update’). (See .1 on screenshot below to locate the ‘Update’ button.)
To Add or Edit Text to a WordPress post:
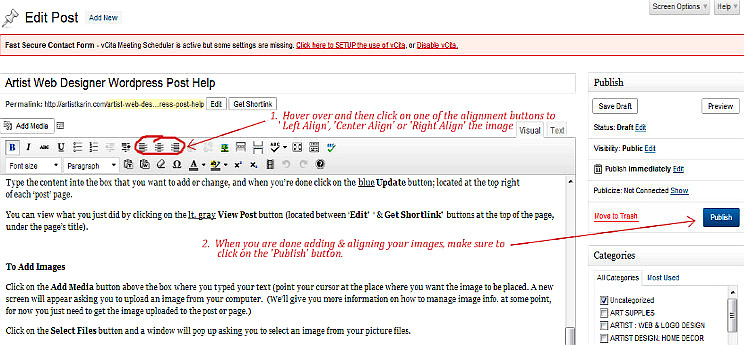
1. Type the content into the box that you want to add or change, and when you’re done click on the ‘Update’ button; located at the top right of each ‘post’ page. ( See 1. in the screenshot below).
2. You can view what you just did by clicking on the ‘View Post’ button (located between ‘Edit’ ‘ & ‘Get Shortlink’ buttons at the top of the page, under the page’s title ( See 2. in the screenshot below).
Click on image to enlarge & view detail
To Add Images To a WordPress post:
3. Click on the ‘‘Add Media’ button above the box where you typed your text (point your cursor at the place where you want the image to be placed. (See .3 on the screenshot above for button location).
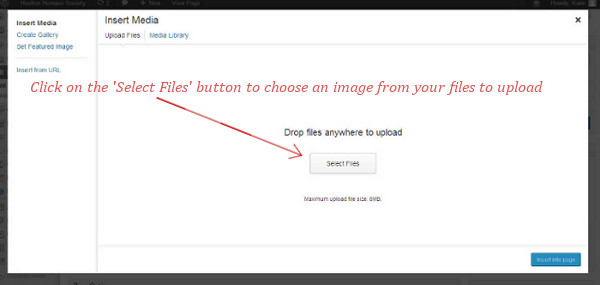
4. A new screen will appear asking you to upload an image from your computer. Click on the ‘Select Files’ button and a new window will pop up asking you to select an image from your picture files. (See screenshot below to locate button).
Click on image to enlarge & view detail
After selecting the image you want to add, you should see it appear as a thumbnail in the ‘Media Library’. Make sure to click the ‘Insert Into Post’ button. (It looks the same & is located in the same place as the one on the lower right of the screenshot above).
Aligning Images:
1. You can align images to the left, center, or the right of the page, by clicking on the correct button in the ‘WYSIWYG’ editor located in the gray-shaded area above the text field.
2. Make sure to save your changes by clicking on the ‘Publish’ button (if it’s a new post) or ‘Update’ button (if it’s an existing one).
(See .2 in the screenshot below)
Click on image to enlarge & view detail
There are more ways to edit your WordPress post…
including making text bold, italic, or changing the color and size of the font (text-size). Hovering over the buttons on the ‘WYSIWYG’ editor will familiarize you with their different functions.
Always remember to update any changes, but once you do only some WordPress themes have the function of saving a previous version as a ‘revision’. Check at the bottom of a post on the theme you have to see if it has them listed. (A revision will only appear after a post has been ‘published’.