Artist : Anatomy Of An Oil Painting
I’ve finally been able to set aside 2 hours for myself to start painting…
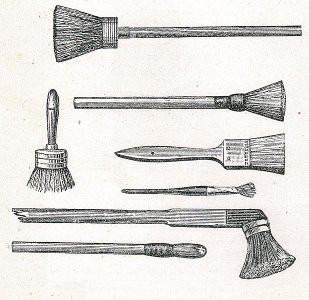
The photo I’ve been aching to recreate is in plain view… my brushes, my colors of oil paint are set out on a palette, and I’ve placed your design onto my canvas, which sits waiting on my easel for me to put the 1st brush stroke on…
In this article I will outline the Anatomy Of An Oil Painting, which will in effect ‘dissect’ the painting process into easy steps, to make sure you have everything you need to know; beginning with your 1st brush stroke… to your last.
Step 1: Photo Assessment:
Ok…There is one more thing that needs to be done before I can start to paint…
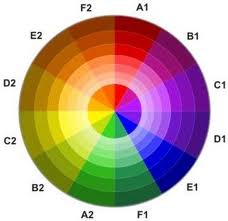
While considering my photo I decide what I want to do about the elements contained within it. I first decide whether the colors contained in the subject are complementary & if they are; figure out how much I want to emphasize them. I do this by adding more ‘saturation’, thus deepening the color. If the opposite condition exits…reducing the saturation of the color is necessary, if it seems too bright. Sometimes I decide on something completely different, (i.e. for example; adding a a pattern to a clothing garment if none exists), that a person is wearing … or conversely, replacing a pattern which may be ‘competing’ too strongly with the person’s face, or a background if it is too ‘busy’. In either case, the composition will work better as a painting than what is original to the photo if these changes are made.
There are a number of different ways to alter an image, I often rely on materials that I have on hand, or find what I’m looking for in photos or magazines. Photo Assessment is one of the most important steps to the outcome of your painting, in terms of composition, which will bring it from being just a re-creation of a photograph… to a work of art!
Another consideration is whether the shadows seem to be too light or too dark. This may not seem apparent in a photograph or will necessarily appear to be detrimental, however; it can really detract from a painting’s composition if not dealt with effectively.
Looking at shadows not only as ‘black’ or ‘gray’, which is how most people ‘see’ them… and instead ‘seeing’ them as a darker version of the same color, (as the element that ‘creates’ them), is a way to make them not only more aesthetically pleasing in your painting, but also a way to be true to the reality of what they really are… COLORS!
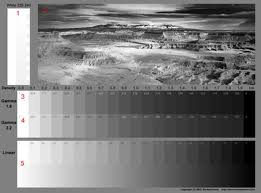
One more important factor in this process, is to determine what the ‘values’ are of the different elements that are in the photo & will be in your painting. ‘Value’ is defined as the relative lightness or darkness of a color. If you add white, (or any light pigment); to a color to lighten it, the lighter the value becomes… conversely’ the more black, (or dark pigment); you add to it, the darker the value will become. When you change these values, you need to have them ‘relate’ to each other. If you lighten a certain value, then you need to lighten the other values in that element to that same degree; in order to make it ‘relate’ to the other ones. (I will going in depth about COLOR in future posts).
Step 2: FINALLY!…That 1st Stroke…
Note: If you have never picked up an oil paint brush, or used oil paints before, you may want to read my post: “1st Time Oil Paint & Brush Use“, before going on further into this section…
Where to start…
Keeping in mind the things I mentioned in ‘Step 1’…it is extremely important for a successful outcome of an oil painting, to maintain the ‘values’; (or… the lighter vs. the darker elements); of the painting as a whole. I begin by choosing one of the darker areas of the main subject & applying a darker pigment of paint; (i.e. a darker version of the color I see in the photo). By doing this, it gives dimension to the painting; as well as giving me a base color to start from. I can then apply layers of lighter pigments to increase the color ‘value’ to the point where I want that particular element to end up. At this point, I may not know exactly where that value will end up, because, even though I understand the difference between what all the values are in the photo; to create the most effective result; I may alter them after I get all the values put down on my canvas.
Staying ‘true’ to the original values of the photo, is important…however, in order to create my own impression and style; I need to employ my own perspective & interpretation of these values, by determining how I want to adjust them in order to project how I want to see them in my painting. Of course, the main subject will contain numerous colors & values; so I continue to employ this technique with each one until I feel that the the colors and values are represented to my satisfaction.
Step 3: Learning the Techniques that Give A Painting Interest:
There are several techniques that may be necessary to achieve the desired characteristics for each element. In previous articles I’ve posted on this site, I provide my own insight into how I learned: shading & highlighting, “Creating Texture“, “Choosing & Mixing Colors“; & “Blending Oil Paints“. Mastering these techniques, like everything else, is achieved by learning how each particular method is executed & by practicing them. To some degree however; these are things you will learn by experimenting on your own.
Step 4: Assessing My Progress… Seeing the ‘Whole Picture’:
It is at this point when I take a ‘step back’ from the painting, to consider how the subject looks as a whole; & decide whether I’m going to need to make changes to make it work as a “Composition“. I actually step away from my painting many times while I’m painting to look at the element I have been working on…since working close-up to the painting is necessary for the detail I am trying to produce. This affords me the ability to focus only on the element I am working on, however; doing so does not give me the ‘whole picture’; which would be a valuable missed step in the outcome of the painting. I do this fairly often, in order not to end up creating a painting that is not cohesive or one which lacks a sense of unity.
After I have applied these techniques to all the other elements, such as the background or other smaller subjects contained within the composition… I determine how all these elements relate to each other, & I make modifications to the colors and values as needed. This is also the time when I decide whether there is a particular element that I want to emphasize. This is most often in the main subject, however; that is not always the case; and especially in the case of a portrait that has multiple subjects. If that condition exists, there may be several elements that need to be emphasized.
Step 5: Making A Painting Come Alive… Almost Finished!
Now that I have rendered the most important parts of the main subject…such as; color, shape, values, shadowing, etc. It’s time to move on to the details that give a painting added interest. My post, “Painting the Elements of An Oil Painting“ : describes this important step, and gives technical advice about some of the many different types of details that will need to be addressed in your painting.
Once the Details are complete; I will again step-back and consider the painting and all it’s elements… as a total sum of it’s parts. This is when I make sure I’ve rectified any ‘mistakes’ I see in color, value, shape, form, & texture. Most likely, at this point I should already have spent enough time stepping- back from it and looking at your work from a distance; during the painting process, that there shouldn’t be any big surprises. It can be possibly both a comfort and a burden, to know that with oil painting, (as long as it hasn’t been varnished yet); you always have the choice to add, subtract, and actually cover-over any part of it you aren’t completely satisfied with.